Setting up a 270 Awnings tent on your van or RV can completely transform your outdoor experience. Whether you’re a seasoned van lifer or new to the world of outdoor adventures, having the right setup can make all the difference. The 270 Awnings tent provides unparalleled coverage, offering protection from the sun, rain, and wind, creating a cozy outdoor living space wherever you go.
In this guide, we’ll explore everything you need to know about setting up your 270 Awnings tent. We’ll break down the process into simple steps, provide you with key tips, and highlight some common mistakes to avoid. By the end, you’ll be ready to quickly and efficiently set up your 270 Awnings tent, no matter where you are.
What Are 270 Awnings?
Before diving into the setup process, let’s first understand what a 270 Awnings tent is and why it’s such a valuable addition to your camping or van life setup.
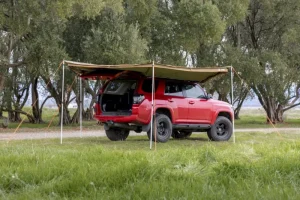
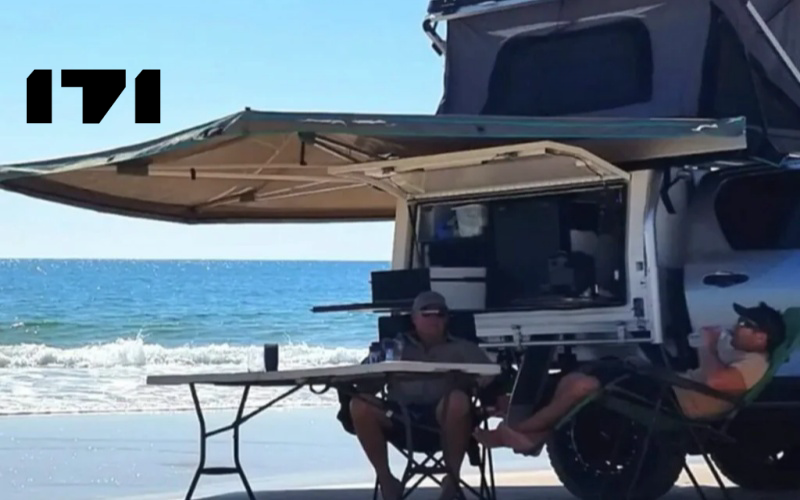
A 270 Awnings tent is a type of retractable awning that extends around three-quarters of your van or RV. Unlike traditional awnings that provide coverage on one side, the 270 Awnings tent wraps around your vehicle, offering a much larger outdoor area for shelter. This added coverage is perfect for creating a shaded or sheltered space for cooking, dining, lounging, or even sleeping.
270 Awnings tents come in various sizes and materials, but they all share the same wraparound design that ensures maximum functionality. The main advantages of a 270 Awnings tent include:
- Generous Coverage: The three-quarters coverage ensures that you can create a substantial outdoor living space.
- Weather Protection: Whether it’s a sunny day or a sudden rainstorm, a 270 Awnings tent helps protect you and your gear from the elements.
- Easy Setup: Despite its size, a 270 Awnings tent is typically easy to install, with most models featuring a quick-folding design and simple mounting systems.
Now that we’ve established what a 270 Awnings tent is, let’s look at how you can set one up with ease.
Essential Tools and Equipment for Setting Up Your 270 Awnings Tent
Before you begin the installation, gather the essential tools and equipment to ensure everything goes smoothly. The good news is you won’t need much to get your 270 Awnings tent up and running.
Key Equipment:
The 270 Awnings Tent: The most important item you’ll need is, of course, the 270 Awnings tent. Make sure that the tent you purchase is the right size for your vehicle. The size of the awning should align with the dimensions of your van or RV to ensure proper coverage.
Mounting Kit: Many 270 Awnings tents come with a pre-designed mounting kit for your vehicle. If not, you can purchase a compatible kit that fits your vehicle’s roof rails or roof bars.
Roof Rails or Roof Bars: These are crucial for mounting the awning. Check that your vehicle is equipped with roof rails or roof bars that are suitable for supporting the 270 Awnings tent.
Support Poles: Depending on the model, you may need additional support poles to help hold the awning’s extended sections in place.
Stakes and Guy Lines (Optional): If you’re setting up in an open area, you may want to stake down your awning for added stability, especially if you’re facing windy conditions.
Once you have these tools ready, it’s time to get started with the setup.
Step-by-Step Guide to Setting Up Your 270 Awnings Tent
Setting up your 270 Awnings tent is straightforward if you follow these simple steps. We’ll break the process down so you can get your outdoor space up and running quickly and easily.
Step 1: Position Your Vehicle
The first thing you need to do is park your vehicle in a flat, level area. A level surface is crucial for ensuring the awning stays in place during use. Avoid parking on sloped or uneven ground, as this could lead to the awning being unstable.
Once parked, position your vehicle so the side where the 270 Awnings tent will extend is facing the desired outdoor area. This ensures that the awning wraps around the vehicle properly and maximizes the amount of space it covers.
Step 2: Unroll and Unpack the 270 Awnings Tent
Now that your vehicle is positioned, it’s time to unroll and unpack the 270 Awnings tent. Most 270 Awnings tents come in a foldable design, making them easy to store and transport. Carefully remove the awning from its storage bag and lay it out beside your vehicle.
Unroll the tent and check that all the components are accounted for—this includes the tent fabric, mounting brackets, poles, and any additional accessories that may come with your specific model.
Step 3: Attach the 270 Awnings Tent to the Vehicle
The next step is to attach the 270 Awnings tent to your vehicle. Most 270 Awnings tents come with mounting brackets that you can use to secure the tent to the roof rails or roof bars of your vehicle. Here’s how to attach the awning:
Check the Mounting Points: Locate the roof rails or roof bars on your vehicle. These will serve as the anchor points for the awning. Make sure they are sturdy and properly installed.
Install the Mounting Bracket: Attach the mounting brackets to the roof rails according to the manufacturer’s instructions. These brackets are typically designed to lock into place securely, so you don’t have to worry about them loosening during use.
Connect the Awning: Lift the 270 Awnings tent and carefully align it with the mounting brackets. Attach the tent to the brackets using the included fasteners or locking mechanisms. Ensure the awning is securely fastened to your vehicle.
Step 4: Extend the 270 Awnings Tent
With the 270 Awnings tent securely mounted, it’s time to extend it. This step is crucial for transforming the tent into its full setup and providing the shelter you need.
Unlock the Tent: Most 270 Awnings tents feature a locking system that keeps the awning folded when not in use. Unlock the system, whether it’s via straps, clips, or a latch.
Pull Out the Awning: Gently pull the tent out from its storage position. As you do this, the awning will begin to unfold, and the fabric will stretch out around the side and rear of your vehicle.
Adjust the Awning: Once the awning is fully extended, adjust its position. Make sure it is evenly spread out around the sides of your vehicle. Ensure there are no wrinkles in the fabric, and that the tent is taut enough to prevent sagging but not overly tight.
Step 5: Use Poles and Guy Lines for Support
Some 270 Awnings tents require additional support to hold up the extended sections of the awning. Here’s how to use poles and guy lines for extra stability:
Insert Poles: If your tent includes support poles, place them under the extended canopy. Adjust the height of the poles to your desired level, ensuring they offer enough support without overextending the fabric.
Use Guy Lines: If your awning comes with guy lines, use them to further stabilize the tent. Attach the guy lines to the tent’s loops and stake them into the ground. Tension the guy lines to keep the awning from flapping in the wind.
Step 6: Secure the Awning (Optional)
For extra stability, especially if you’re expecting wind or bad weather, consider pegging down the awning’s edges. Some 270 Awnings tents feature ground anchors that you can stake into the earth. This helps prevent the awning from lifting or shifting.
Stake the Corners: If your 270 Awnings tent has stake-out points at the corners, drive stakes into the ground. This keeps the fabric taut and prevents movement.
Double-Check the Tension: Once all guy lines and stakes are in place, double-check the tension of the awning. Make sure it’s tight enough to prevent sagging but not overly stressed, which could lead to damage.
Step 7: Enjoy Your New Outdoor Space
Now that your 270 Awnings tent is set up, it’s time to enjoy the space! Whether you’re cooking, relaxing, or socializing, you’ll find that this additional covered area makes a world of difference. You can spend more time outside without worrying about the weather.
If you need to store the awning after use, simply reverse the steps. Retract the tent, remove the support poles, and carefully fold the awning back into its storage bag.
Tips for Maintaining Your 270 Awnings Tent
To keep your 270 Awnings tent in top condition, follow these simple maintenance tips:
Clean the Fabric Regularly: Dirt, debris, and tree sap can accumulate on your awning. Regularly clean the fabric with mild soap and water. Avoid harsh detergents that could damage the material.
Inspect for Wear and Tear: Check your awning after each use for any signs of wear, such as small tears or fraying. If you notice any damage, repair it immediately to prevent it from worsening.
Store Properly: Always store your 270 Awnings tent in a dry, cool place when not in use. Ensure it is completely dry before packing it away to prevent mold or mildew buildup.
Setting up your 270 Awnings tent is a simple process when you follow these steps. By taking the time to properly mount, extend, and stabilize the awning, you’ll create a comfortable outdoor living space that enhances your camping or RV experience. With the added protection and shelter, you can enjoy the great outdoors without worrying about the weather.
Remember to maintain your 270 Awnings tent to extend its lifespan and ensure it performs at its best. With these tips, you’ll be able to quickly and easily set up your 270 Awnings tent and enjoy countless outdoor adventures.